There are tons of tech enthusiasts who have RGB lighting coming out of their entire PC, including motherboard, graphics card, CPU cooler, and more. The reason behind such a craze is their love for RGB lighting. Several brands like MSI, ASUS, and many others have been producing PC components with red, green, and blue lights to help such users fulfill their wishes. Suppose you’re a user building a custom PC for the first time. In such a case, you must be wondering what can I hook up to the motherboard RGB header.
You can seek help from this post and know everything you may need before attaching components with the RGB headers. Remember, there are several precautions that you have to follow before starting the process. For example, RGB fans have specific voltage requirements that must be followed to utilize their true capabilities. Moreover, there are certain ways to connect an RGB fan to the header.
Key Takeaways
- A motherboard RGB header connects and controls RGB lighting devices.
- A motherboard RGB header has different types, voltages, and signals.
- A motherboard RGB header has different brands, software, and compatibility.
- A motherboard RGB header can hook up various RGB devices, such as fans, strips, coolers, etc.
- A motherboard RGB header can customize the lighting effect of RGB devices.
Where are RGB headers located on the motherboard?
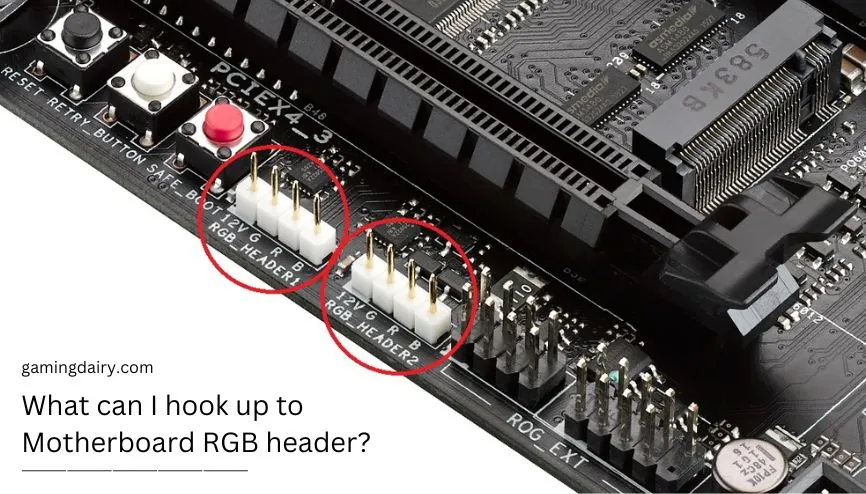
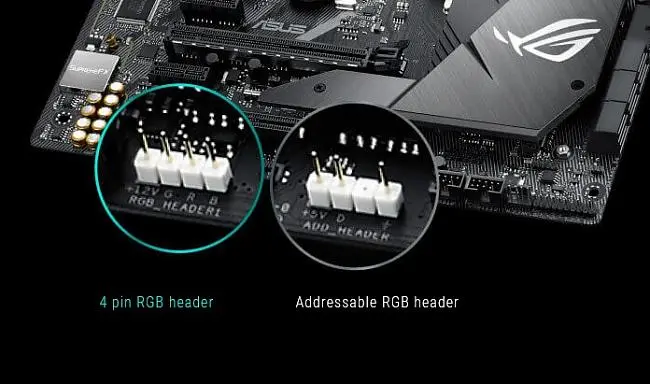
Many motherboards from recent manufacturers, including MSI and Asus, have an RGB header port. Some modern motherboards include addressable RGB headers, whereas few lack them. The RGB headers are labeled RGB HEADER1 and RGB HEADER2 in the motherboard layout index. The RGB header is located on the motherboard so that one is near the power connection on the board’s top edge, while the other is in front panel audio and serial port headers on the board’s bottom side. You can also take help from the board’s manual.

The majority of popular motherboards contain an RGB header. It provides 12V DC power to RGB devices such as fans and strips, as well as data in red, green, and blue color channels. RGB headers provide power to RGB LED strips. In contrast to regular connectors, which have numerous purposes. If your motherboard has one, you may utilize this header to power your LED strips. For RGB LEDs, you need to connect to the connector labeled RGB on the motherboard. You don’t need expertise in hardware to connect RGB fans to the board; rather, read this post.
How to hook up RGB fans to the motherboard?
Hooking the RGB fans to the motherboard is a pretty straightforward method that can be done in no time. All you have to do is to follow all the steps given below. Those steps include the following:
- Step 1: Plug the RGB lead of the fan into the appropriate header on the motherboard.
Note: There are different motherboards, and each has different header configurations. Some have 3-pin or 4-pin headers, while few even lack RGB headers. So ensure what header your board has before inserting the lead.
- Step 2: Connect the RGB fan to the power supply unit using a SATA connector.
Note: If your board doesn’t have an RGB header. In such a case, add a fan controller to the motherboard or directly connect the RGB fan to the power supply unit.
You don’t need an extra device to connect a 3-pin and 4-pin fan. However, a motherboard without headers would require some tools to make the connection work. Once you have studied the steps and distinguished them accurately. RGB fans are guarded by voltage as well as being less complicated and cheaper in price. This is valid only if the connector has 3 cables. There are 3 square holes on the frontage and wires at the backside. Remember to turn off the power switch before proceeding.
How to plug a 4-pin RGB fan?
The 4-pin RGB fan is also called a PWM fan. These fans are faster and more impressive. RGB enthusiasts or high-end users widely used these since they have more control over 4-pin fans. It is superior to other fans because it makes noise and capacity less noticeable. There are four square openings on the front side and four wires on the backside. You cannot place them on a connector that has three mates. If your motherboard lacks a header, you must use this connection.
To plug a 4-pin RGB fan, follow these steps.
- Step 1: Ensure to open the PC case and separate it from the system.
- Step 2: Read every instruction related to the headers given in the manual.
- Step 3: Locate the RGB spots on the motherboard.
- Step 4: Connect the pins and slightly press them for a proper connection.
Conclusion
We have explained how to connect the RGB LED lights on your motherboard to the RGB cables that come with your computer. We hope that you will find the information you are looking for in this guide. The presence of RGB headers gives the motherboard more prominence, which means you don’t need a controller or power supply to drive the lights. It’s also important not to ignore the truth that this solution reduces case confusion and keeps your PC in top condition.
Frequently Asked Questions
Do all the motherboards have RGB headers?
The short answer is no. Most motherboards do have two RGB connections that provide power at 12V but not all. Some motherboards have 3-pin or 4-pin RGB headers, but few lack both headers. If your board lacks this feature, you can use USB-powered RGB strips and connect them using the USB ports to your computer.
Does my motherboard have an RGB Header?
The easiest way to check whether your motherboard has RGB headers is by using the product manual that comes with the box. On the flip side, you can also use the internet, search for your motherboard, and read its specifications. The last method is by physically inspecting the board. You may find an RGB HEADER on the board near the port if it has one.


![Can Motherboard Affect FPS? Each Factor is Explained [2024]](https://www.ingameloop.com/wp-content/uploads/Can-Motherboard-Affect-FPS-450x257.jpg)

![How to Test Motherboard without CPU? 4 Methods [2024]](https://www.ingameloop.com/wp-content/uploads/How-to-Test-Motherboard-without-CPU-450x257.jpg)
![Which Motherboard supports DDR5 RAM? [2024]](https://www.ingameloop.com/wp-content/uploads/Which-Motherboard-supports-DDR5-RAM-450x257.jpg)